Step-by-Step Guide to Using Google Slides for Presentations
Hey there, presentation pals!
Unlock the Power of Visual Storytelling: Your Step-by-Step Guide to Google Slides Mastery
Let's be honest, who here hasn't felt a mild sense of dread when tasked with creating a presentation? Visions of boring bullet points and snooze-inducing delivery often dance in our heads. We’ve all been there. You’re staring at a blank screen, cursor blinking mockingly, thinking, "Ugh, another presentation?" Maybe you're picturing your audience's glazed-over eyes as you drone on about Q3 earnings or the nuances of the latest marketing strategy. Or perhaps you've had the unfortunate experience of sitting through a presentation where the slides were so cluttered and confusing that you left feeling more lost than when you arrived. We’ve all suffered through death by Power Point (or in this case, death by Google Slides!).
But what if I told you creating a compelling, engaging, and even (dare I say)funpresentation is totally within your reach? What if you could ditch the fear and embrace the power of visual storytelling? You see, presentations don't have to be a soul-crushing experience. In fact, they can be a fantastic opportunity to share your ideas, inspire your audience, and even showcase your creative flair. Think about some of the most memorable presentations you've ever seen. What made them stand out? Was it the speaker's charisma? Sure, that plays a role. But more often than not, it's the visuals that truly grab our attention and help us understand the message.
Google Slides, often underestimated, is a powerful, free, and accessible tool right at your fingertips. It's not just a Power Point clone; it’s a collaborative platform that allows you to create stunning presentations, whether you're a seasoned pro or a complete beginner. I remember one time, I was pitching a new project to a potential client. I spent hours crafting a beautiful Google Slides presentation, complete with eye-catching visuals and a clear, concise message. The client was so impressed that they immediately signed on! That's the power of a well-crafted presentation.
But here's the kicker: simply knowing Google Slides exists isn't enough. You need to knowhowto use it effectively. And that's where this guide comes in. We're not just going to show you the basics of adding text and images (although we’ll cover that too!). We're going to dive deep into the features that will transform your presentations from "meh" to magnificent.We’ll unlock the secrets to creating visually appealing layouts, incorporating dynamic elements, and delivering a presentation that leaves your audience wanting more. Think of it like this: you have a toolbox filled with amazing tools, but you need a guide to show you how to use them to build something truly spectacular.
Forget the generic tutorials and outdated advice. We’re going to provide actionable tips, real-world examples, and a step-by-step approach that will empower you to create presentations that truly shine. We’re going to take you from Google Slides novice to presentation powerhouse. Whether you're pitching a new product, presenting research findings, or simply sharing your vacation photos, this guide will give you the skills and confidence you need to captivate your audience. Prepare to embark on a journey to Google Slides mastery! Are you ready to transform your presentations and leave a lasting impression? Let’s dive in and discover the magic of Google Slides!
Let's Get Started: Your Google Slides Journey Begins Now!
Alright, friends, let's jump into the wonderful world of Google Slides! Forget those stuffy tutorials – we're going to make this fun and practical. We'll break down each step so you can easily follow along and create killer presentations in no time. Remember that feeling of overwhelm? We’re kicking that to the curb right now!
• Accessing Google Slides: Your Gateway to Presentation Glory
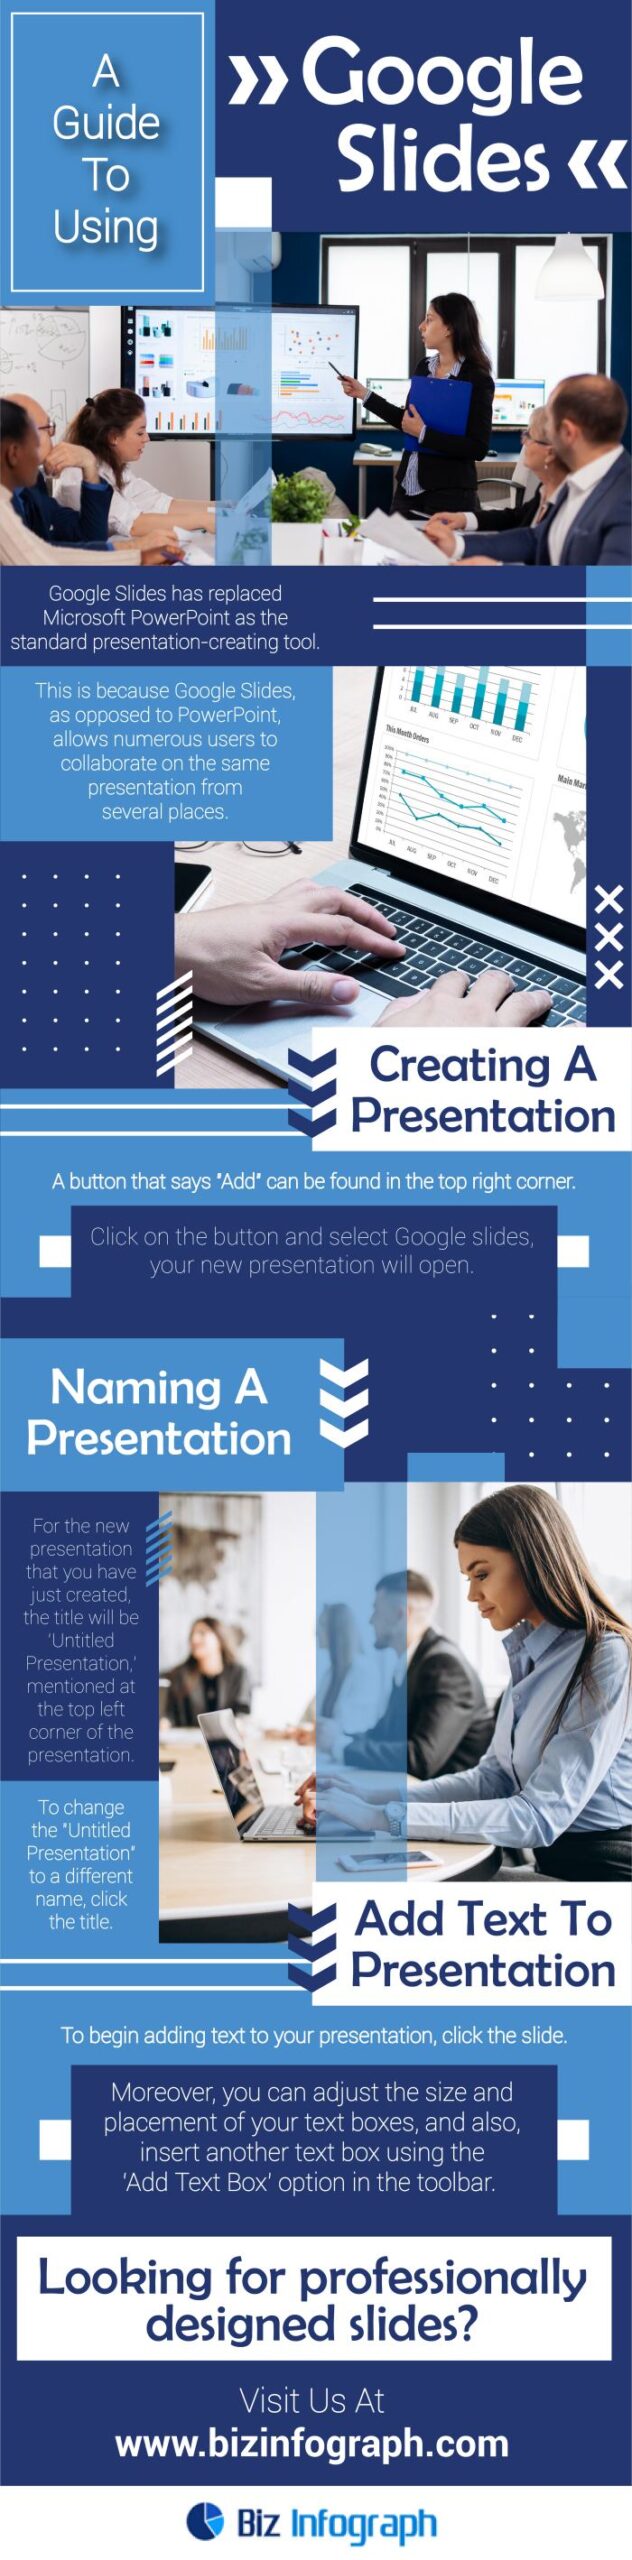
First things first, you need to access Google Slides. It's super easy if you already use other Google services like Gmail or Google Drive. Just head over to your Google Drive, click on "New," then select "Google Slides." Bam! You're in! Alternatively, you can go directly to the Google Slides website (slides.google.com). Just make sure you're logged in with your Google account. If you don't have a Google account, well, now's the perfect time to create one – it's free and unlocks a whole universe of helpful tools.
• Choosing a Template: Don't Reinvent the Wheel!
Okay, you're in Google Slides, staring at a blank canvas. Feeling a little intimidated? Don't be! Google Slides offers a ton of pre-designed templates to get you started. These templates are a lifesaver, especially if you're short on time or design skills. Just click on "Template gallery" and browse through the options. You'll find templates for everything from business presentations to educational slideshows. Choose one that resonates with your topic and style, and then customize it to your heart's content. Think of it like choosing a pre-made cake mix instead of baking from scratch – you still get a delicious cake, but with a lot less effort!
• Mastering the Basics: Adding Text and Images
Now, let's talk about the fundamentals: adding text and images. These are the building blocks of any good presentation. To add text, simply click on the "Text box" icon in the toolbar (it looks like a "T" inside a box). Then, drag your mouse to create a text box on your slide and start typing. You can format your text using the options in the toolbar, like font, size, color, and alignment. Adding images is just as easy. Click on the "Insert image" icon and choose an image from your computer, Google Drive, or the web. You can then resize and reposition the image to fit your slide. Remember, a picture is worth a thousand words, so choose your images wisely!
• Layouts: Guiding the Eye and Maximizing Impact
Layouts are often overlooked, but they play a crucial role in how your audience perceives your information. A well-designed layout can guide the eye, highlight key points, and make your presentation more visually appealing. Google Slides offers a variety of pre-designed layouts that you can access by clicking on "Layout" in the toolbar. Experiment with different layouts to find the one that best suits your content. Don't be afraid to break the rules and create your own custom layouts as well! The key is to keep it clean, organized, and easy to follow.
• Transitions and Animations: Adding a Touch of Pizzazz
Transitions and animations can add a touch of visual flair to your presentation and keep your audience engaged. Transitions are the visual effects that occur when you move from one slide to the next, while animations are the effects that you apply to individual elements on a slide. To add a transition, click on "Transition" in the toolbar and choose from a variety of options, like fade, slide, or flip. To add an animation, select the element you want to animate and then click on Animate.You can then choose from a variety of animation effects, like fade in, fly in, or zoom in. Just remember, moderation is key! Too many transitions and animations can be distracting and overwhelming. Use them sparingly to highlight key points and add a touch of visual interest.
• Collaboration is Key: Teamwork Makes the Dream Work
One of the best things about Google Slides is its collaborative nature. You can easily share your presentation with others and work on it together in real-time. This is a huge time-saver and allows you to get valuable feedback from your colleagues. To share your presentation, click on the "Share" button in the upper right corner and enter the email addresses of the people you want to collaborate with. You can then choose whether they can view, comment, or edit your presentation. Collaboration is a game-changer when it comes to creating impactful presentations.
• Presenter View: Your Secret Weapon for a Smooth Delivery
Finally, let's talk about Presenter View. This is your secret weapon for delivering a smooth and confident presentation. Presenter View allows you to see your notes, upcoming slides, and a timer on your computer screen while your audience only sees the current slide. This allows you to stay on track, remember key points, and manage your time effectively. To access Presenter View, click on the "Present" button and then select "Presenter View." Trust me, this will make a world of difference in your presentation delivery!
• Charts and Diagrams: Visualizing Data with Style
Want to present data in a clear and engaging way? Google Slides has you covered! You can easily insert charts and diagrams to visualize your data and make it more understandable for your audience. Click on "Insert" then "Chart" to choose from various chart types like bar graphs, pie charts, and line graphs. You can then import data from Google Sheets or manually enter it. Customize the colors, labels, and other elements to match your presentation's style. Remember, a well-designed chart can tell a story and make complex data easy to digest.
• Videos and Audio: Engage All the Senses
Why stick to just text and images when you can add videos and audio to your Google Slides presentations? Adding multimedia elements can make your presentation more engaging and memorable. You can insert videos from You Tube or upload them from your computer. You can also add audio files to play background music or narration. To insert a video, click on "Insert" then Video.To add audio, click on "Insert" then Audio.Just be mindful of file sizes and copyright restrictions. Adding videos and audio can really bring your presentation to life!
• Master Slides: Streamline Your Design Process
Want to make consistent changes across all your slides? Master slides are your best friend! Master slides allow you to create a template for your entire presentation, ensuring a consistent look and feel. To access master slides, click on "View" then Master.Any changes you make to the master slides will be applied to all the slides in your presentation. This is a huge time-saver when you want to change the font, color scheme, or logo across your entire presentation. Master slides are a must-know for efficient presentation design.
• Keyboard Shortcuts: Speed Up Your Workflow
Want to become a Google Slides ninja? Learn some keyboard shortcuts! Keyboard shortcuts can significantly speed up your workflow and make you more efficient. For example, Ctrl+C copies, Ctrl+V pastes, and Ctrl+Z undoes. There are tons of other keyboard shortcuts that can help you format text, insert elements, and navigate your presentation. Search online for a list of Google Slides keyboard shortcuts and start incorporating them into your workflow. You'll be amazed at how much time you save!
• Practice, Practice, Practice: Nail Your Delivery
No matter how amazing your Google Slides presentation is, it won't matter if you don't practice your delivery. Practice is key to delivering a confident and engaging presentation. Rehearse your presentation multiple times, paying attention to your pacing, tone, and body language. Practice with a friend or colleague and ask for feedback. The more you practice, the more comfortable and confident you'll become. Remember, practice makes perfect!
Frequently Asked Questions (FAQ)
Got questions? We’ve got answers! Here are some frequently asked questions about using Google Slides for presentations:
Q: Can I use Google Slides offline?
A: Yes! You can enable offline access to Google Slides so you can work on your presentations even without an internet connection. Just go to your Google Drive settings and enable offline access. Any changes you make offline will be synced when you reconnect to the internet.
Q: How do I add speaker notes in Google Slides?
A: Speaker notes are a great way to keep track of key points and talking points during your presentation. To add speaker notes, simply click on the "Click to add speaker notes" section below each slide. Type your notes in this section, and they will be visible to you in Presenter View but not to your audience.
Q: What's the best way to share a Google Slides presentation?
A: There are several ways to share a Google Slides presentation. You can share it with specific people by entering their email addresses and choosing their permission level (view, comment, or edit). You can also create a shareable link that anyone with the link can view. Choose the sharing method that best suits your needs and privacy preferences.
Q: How do I embed a Google Slides presentation on my website?
A: Embedding a Google Slides presentation on your website is a great way to share your content with a wider audience. To embed your presentation, click on "File" then "Publish to the web." Choose the embed option and copy the embed code. Then, paste the embed code into your website's HTML.
Conclusion: Your Presentation Power-Up!
Well, friends, we've reached the end of our Google Slides adventure! We've covered everything from the basics of creating slides to the advanced features that will take your presentations to the next level. Remember, creating a compelling presentation isn't about being a design expert; it's about effectively communicating your message and engaging your audience.
In this guide, we've explored how to access Google Slides, choose a template, add text and images, master layouts, incorporate transitions and animations, collaborate with others, use Presenter View, visualize data with charts and diagrams, add videos and audio, streamline your design process with master slides, speed up your workflow with keyboard shortcuts, and nail your delivery with practice. That’s a lot of ground covered, and now you’re armed with the knowledge to craft presentations that truly shine.
But knowledge is only power when it's put into action. So, I challenge you to take what you've learned in this guide and create your next Google Slides masterpiece! Whether you're presenting to a room full of colleagues or sharing your ideas with the world online, remember the tips and tricks we've discussed. Don't be afraid to experiment, get creative, and have fun! Think back to those presentations you dreaded making; now, think of the potential. You have the tools; now it’s time to build something amazing.
Ready to ditch the dull and embrace the dazzling? It's time to open up Google Slides and start creating! Your audience is waiting, and they're ready to be impressed. Now go forth and present with confidence and style! What brilliant presentation idea will you bring to life first?
Post a Comment for "Step-by-Step Guide to Using Google Slides for Presentations"
Post a Comment