Step-by-Step Guide to Editing Videos on Final Cut Pro
Unlock Your Inner Spielberg: A Step-by-Step Guide to Mastering Video Editing with Final Cut Pro
Hello, fellow video enthusiasts!
Ever feel like you have a story to tell, but it's trapped inside a bunch of raw footage? Or maybe you've got that perfect vacation video, but it's, well, a little...rough? We've all been there. You shoot hours of footage, dreaming of a cinematic masterpiece, only to end up with a digital mess collecting virtual dust. Let's be honest, the struggle is real.
It's like trying to bake a gourmet cake with only a bag of flour and a vague memory of your grandma's recipe. Youknowthere's potential, but the execution is… challenging. The reality is that raw video footage is just that: raw. It needs to be refined, shaped, and polished to truly shine.
Imagine this: you're scrolling through Instagram and stumble upon a captivating travel vlog. The editing is seamless, the music perfectly complements the visuals, and the story unfolds with effortless grace. You think, "Wow, I wish I could do that!" And guess what? You absolutely can!
The secret weapon behind countless stunning videos isn't some magical fairy dust (though that would be nice). It's a powerful piece of software called Final Cut Pro. Now, I know what you might be thinking: "Final Cut Pro? Isn't that for professionals? It looks intimidating!" And okay, itcanseem a little daunting at first glance. But trust me, with a little guidance, you can unlock its full potential and transform your videos from "meh" to magnificent.
Think of Final Cut Pro as your digital film studio. It's the place where you can piece together your footage, add music, create stunning visual effects, and tell your story in a way that captivates your audience. It's like having a director, editor, and special effects artist all rolled into one convenient package.
But here’s the thing: even the most powerful tool is useless if you don't know how to use it. That's where this guide comes in. We’re going to break down the video editing process in Final Cut Pro into easy-to-follow, bite-sized steps. No confusing jargon, no overwhelming technical details, just a clear and concise roadmap to help you create videos you'll be proud to share.
From importing your footage to exporting your final masterpiece, we’ll cover all the essential techniques you need to know. We’ll also share some insider tips and tricks that will help you work faster and more efficiently. So, grab a cup of coffee (or your beverage of choice), fire up Final Cut Pro, and let’s dive in! Are you ready to transform your raw footage into something truly amazing? Let’s get started!
Your Final Cut Pro Journey Begins Here
Okay, friends, buckle up! We're about to embark on a journey to transform you from a video editing novice into a Final Cut Pro ninja. This isn't just a dry, technical manual. We're going to get our hands dirty, experiment, and have some fun along the way. Remember, the best way to learn is by doing, so don't be afraid to experiment and make mistakes. That's how you'll truly master the art of video editing.
• Importing Your Footage: The Foundation of Your Project
Think of importing your footage as laying the foundation for a house. You need a solid foundation before you can start building anything else. In Final Cut Pro, importing is simple: Just drag and drop your video clips into the "Event" area (usually located in the top left corner). Final Cut Pro will then analyze your footage and create optimized versions for editing. Make sure your external hard drive (if you're using one) is properly connected and recognized by your computer before you start importing. This prevents frustrating disconnects mid-import.
• Creating a New Project: Setting the Stage
Once your footage is imported, it's time to create a new project. Think of your project as the canvas on which you'll create your video masterpiece. Go to File > New > Project. Here, you'll choose the settings for your project, such as resolution (e.g., 1080p, 4K), frame rate (e.g., 24fps, 30fps, 60fps), and aspect ratio (e.g., 16:9). Choosing the right settings is crucial for achieving the desired look and feel for your video. If you’re unsure, matching the project settings to your footage's original settings is generally a safe bet. For example, if your footage was shot at 1080p and 30fps, set your project to the same parameters. If you are posting to You Tube or Vimeo stick to these standards.
• Navigating the Final Cut Pro Interface: Getting Acquainted with Your Workspace
Okay, let’s face it, Final Cut Pro's interface can look a bit intimidating at first. But don't worry, we'll break it down. The main areas you need to know are:
The Browser: This is where all your imported footage, audio files, and graphics are stored. Think of it as your media library.
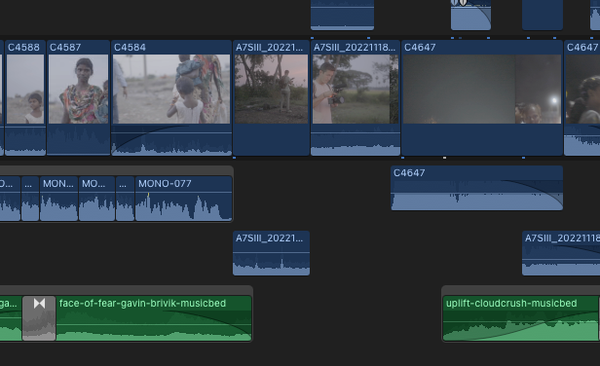
The Timeline: This is where you'll assemble your video, add transitions, and adjust audio levels. It's the heart of your editing process.
The Viewer: This is where you can preview your footage and see how your edits are coming together. The Inspector: This is where you can adjust various parameters of your clips, such as color, audio levels, and effects.Take some time to explore the interface and familiarize yourself with the different panels. The more comfortable you are with the layout, the faster and more efficient you'll be.
• Basic Editing Techniques: Cutting, Trimming, and Arranging Your Clips
This is where the magic happens! Let's start with the basics:
Cutting: Use the Blade tool (or press "B") to cut your clips into smaller segments. This is essential for removing unwanted footage and creating a cohesive narrative.
Trimming: Use the Trim tool (or press "T") to adjust the in and out points of your clips. This allows you to fine-tune the timing of your edits and create seamless transitions.
Arranging: Drag and drop your clips in the Timeline to arrange them in the desired order. This is how you'll build the structure of your video.
Pro Tip: Use the "Magnetic Timeline" feature (enabled by default) to automatically snap clips together, preventing gaps and ensuring smooth transitions. This is a lifesaver for keeping your timeline organized and preventing accidental errors.
• Adding Transitions: Smoothing Out the Edges
Transitions are like the glue that holds your video together. They help to smooth out the cuts between clips and create a more visually appealing flow. Final Cut Pro offers a wide variety of transitions, from simple cross dissolves to more elaborate wipes and animations.
To add a transition, simply drag it from the Transitions browser (located in the bottom left corner) onto the cut point between two clips. Experiment with different transitions to see which ones work best for your style and the mood of your video. But remember, less is often more. Overusing transitions can be distracting and take away from the story you're trying to tell.
• Working with Audio: Sound is Half the Picture
Never underestimate the power of good audio. In fact, many would argue it'smoreimportant than the visuals. Bad audio can ruin even the most beautifully shot video.
Final Cut Pro allows you to adjust the audio levels of your clips, add music and sound effects, and even remove unwanted noise. To adjust audio levels, simply drag the volume slider on each clip in the Timeline. To add music or sound effects, drag the audio files from the Browser onto the Timeline below your video clips. Make sure your music complements the mood of your video and doesn't overpower the dialogue or other important sounds. Pay close attention to the audio levels. The key to great audio is balance and clarity.
• Adding Text and Titles: Getting Your Message Across
Text and titles are essential for adding context, providing information, and grabbing your viewers' attention. Final Cut Pro offers a wide variety of text and title templates that you can customize to suit your needs.
To add text or a title, simply drag it from the Titles browser onto the Timeline above your video clips. You can then customize the font, size, color, and animation of your text in the Inspector. Use text sparingly and make sure it's easy to read. Choose a font that is clear and legible, and use contrasting colors to ensure your text stands out against the background. And remember, keep it concise. Viewers should understand your message at a glance.
• Color Correction and Grading: Enhancing the Visuals
Color correction and grading can dramatically improve the look and feel of your video. Color correction involves fixing any technical issues with your footage, such as exposure problems or color casts. Color grading involves creatively enhancing the colors to achieve a specific mood or aesthetic.
Final Cut Pro offers a range of color correction and grading tools, including color wheels, curves, and scopes. These tools allow you to adjust the brightness, contrast, saturation, and hue of your footage. Color grading is an art form in itself, so don't be afraid to experiment and develop your own unique style. Start by correcting any technical issues, then move on to creative grading.
• Exporting Your Video: Sharing Your Masterpiece with the World
Finally, the moment you've been waiting for! It's time to export your video and share it with the world. Go to File > Share and choose the desired export settings. You'll need to choose a codec (e.g., H.264, Pro Res), resolution, frame rate, and bitrate. If you're uploading to You Tube or Vimeo, there are specific recommended settings that you should follow.
Consider your target audience and the platform you'll be sharing your video on. Exporting is the final step in the process, so don't rush it. Double-check your settings and make sure everything looks and sounds the way you want it to before you hit that export button.
Frequently Asked Questions (FAQ) About Final Cut Pro
Okay, let's tackle some of those burning questions you might have. We've all been there, scratching our heads and wondering, "How do I do that?" Don't worry; we've got you covered.
• Question: I'm new to video editing. Is Final Cut Pro too complicated for me?
• Answer: While Final Cut Pro is a professional-grade software, it's actually quite user-friendly once you get the hang of the basics. This guide is designed to walk you through the process step-by-step. Start with the fundamentals and gradually explore more advanced features as you become more comfortable. There are also tons of free tutorials available online that can help you learn specific techniques.
• Question: What are the minimum system requirements for running Final Cut Pro?
• Answer: Final Cut Pro is designed to work seamlessly on Apple devices. To ensure smooth performance, you'll need a Mac with mac OS 11.5.1 or later, at least 4GB of RAM (8GB recommended), a Metal-capable graphics card, and at least
3.8GB of available disk space. For best results, we recommend using a Mac with a dedicated graphics card and plenty of RAM.
• Question: How do I fix choppy or laggy playback in Final Cut Pro?
• Answer: Choppy playback can be frustrating, but there are several things you can try. First, make sure your system meets the minimum requirements for running Final Cut Pro. Second, try optimizing your footage by creating proxy media. Proxy media are lower-resolution versions of your original footage that are easier for your computer to process. Finally, try closing any unnecessary applications that are running in the background.
• Question: Where can I find free music and sound effects for my videos?
• Answer: There are many websites that offer royalty-free music and sound effects that you can use in your videos. Some popular options include Epidemic Sound, Artlist, and You Tube Audio Library. Just be sure to read the licensing agreements carefully to ensure that you're using the music and sound effects in accordance with the terms of service.
Unleash Your Creative Potential
Well, there you have it, friends! A step-by-step guide to editing videos on Final Cut Pro. We've covered the fundamentals, from importing your footage to exporting your final masterpiece. Now it's your turn to put your knowledge into practice and start creating amazing videos.
Remember, video editing is a journey, not a destination. Don't be afraid to experiment, make mistakes, and learn from your experiences. The more you practice, the better you'll become. So, what are you waiting for? Fire up Final Cut Pro and start unleashing your creative potential!
Now, go forth and create something amazing! Share your video editing journey with us in the comments below. What are you working on? What challenges are you facing? Let's learn from each other and inspire each other to create even better videos. And who knows, maybe your next video will be the next viral sensation!
What story will you tell?
Post a Comment for "Step-by-Step Guide to Editing Videos on Final Cut Pro"
Post a Comment