Step-by-Step Guide to Using Google Ads Editor
Unlock Your Google Ads Potential: A Step-by-Step Guide to Mastering Google Ads Editor
Hey there, fellow digital marketer! Ever feel like wrangling your Google Ads campaigns is like trying to herd cats? You’re juggling keywords, ad copy, bids, and budgets, all while trying to keep up with Google's ever-changing algorithms. It's enough to make anyone's head spin! We've all been there, staring at the Google Ads interface, feeling like we're missing something crucial. Maybe you're spending hours making small tweaks, only to find your performance hasn't improved. Or perhaps you're terrified of making a mistake that could tank your entire campaign.
Think of it like this: you’re a chef trying to prepare a gourmet meal using only a dull knife and a rusty pan. Sure, you might be able to pull something together, but it's going to take way longer and the results probably won't be as impressive as you hoped. Now, imagine having a set of professional-grade knives, a state-of-the-art oven, and all the latest culinary gadgets at your disposal. Suddenly, that gourmet meal seems a lot more achievable, right? That's where Google Ads Editor comes in. It's the secret weapon that allows seasoned marketers and burgeoning entrepreneurs alike to manage even the most complex paid advertising campaigns efficiently and effectively. The issue is this powerful tool is often overlooked. Many marketers stick to the online interface, unaware of the time-saving and performance-boosting potential that awaits them. It's like having a sports car in your garage but only driving it to the grocery store – you're not even scratching the surface of what it can do!
So, what's the solution? Mastering Google Ads Editor. It's like learning a new language for your marketing efforts, but trust me, the payoff is huge. We’re talking about streamlining your workflow, making bulk changes in seconds, and uncovering hidden opportunities you might have missed in the standard Google Ads interface. Imagine this: you need to update the landing page URL for hundreds of ads. Doing that manually in Google Ads would take hours, potentially introducing errors along the way. With Google Ads Editor, you can do it in a matter of minutes. Want to test different ad copy variations quickly? Google Ads Editor makes it a breeze. Need to optimize bids based on performance data? You can do it all offline and upload the changes when you're ready.
Think of Google Ads Editor as your personal command center for all things paid advertising. It lets you work offline, make bulk edits, and manage your campaigns with surgical precision. It's about taking control of your advertising destiny and achieving the results you've always dreamed of. Are you ready to ditch the manual labor and unlock the true potential of your Google Ads campaigns? Are you ready to become a master of efficiency and achieve the ROI you deserve? Then keep reading, because we're about to dive into a step-by-step guide that will transform you from a Google Ads novice to a Google Ads Editor pro.
Step-by-Step Guide to Using Google Ads Editor
Alright, friends, let's get down to business. We're going to walk through the essential steps to get you comfortable and confident using Google Ads Editor. Buckle up, because this is where the magic happens!
Setting Up and Navigating Google Ads Editor
Before we dive into the nitty-gritty, let’s make sure you’re all set up and ready to roll. Think of this as preparing your workspace before starting a big project.
• Download and Install Google Ads Editor: This might seem obvious, but it’s the first hurdle! Head over to the Google Ads website and find the download link for Google Ads Editor. It's free, so no need to worry about hidden costs. Installation is straightforward – just follow the on-screen instructions.
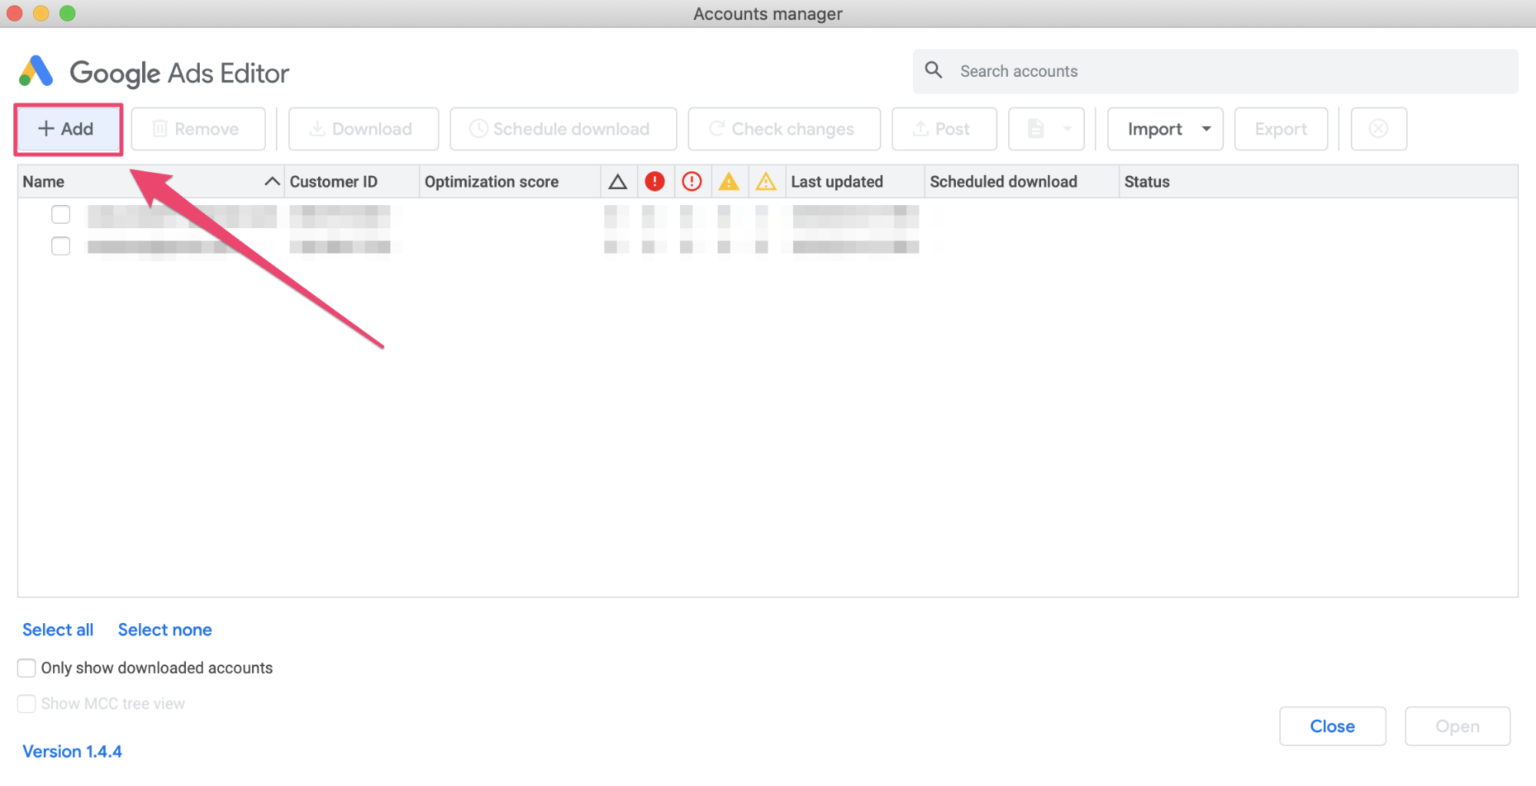
• Add Your Google Ads Account: Once you’ve installed the Editor, launch it and click "Add account." You’ll be prompted to sign in with your Google account that's linked to your Google Ads account. Grant the necessary permissions, and boom – your account is connected!
• Download Campaigns: Now, you need to download your existing campaigns into the Editor. Click "Get recent changes" and choose the campaigns you want to manage offline. Think of this as downloading a copy of your campaign data to your computer. Choose "Base campaign" to start with the current settings.
• Familiarize Yourself with the Interface: The Editor interface might seem a bit overwhelming at first, but don't panic! Here's a quick rundown: Account Tree: On the left side, you'll see a hierarchical structure of your account, campaigns, ad groups, and keywords. This is your primary navigation tool.
Data View: The main area displays the details of whatever you've selected in the account tree. This is where you'll make most of your edits.
Edit Panel: Located at the bottom, this panel allows you to modify the settings of the selected item.
Toolbar: The toolbar at the top provides quick access to common actions like posting changes, getting recent changes, and finding and replacing text.
Making Bulk Edits Like a Pro
This is where Google Ads Editor truly shines! Bulk edits are your secret weapon for saving time and maximizing efficiency. Imagine changing bids for hundreds of keywords in just a few clicks – that's the power we're talking about.
• Selecting Multiple Items: To make bulk edits, you first need to select the items you want to modify. You can do this by: Ctrl+Click (or Cmd+Click on Mac): Select individual items one by one.
Shift+Click: Select a range of items.
Using Filters: Create filters to select items based on specific criteria (e.g., all keywords with a Quality Score below 5). This is incredibly powerful for targeted changes.
• Using the Edit Panel: Once you've selected your items, the Edit Panel at the bottom becomes your control center. Here, you can modify various settings, such as: Bids: Adjust bids for keywords, ad groups, or even entire campaigns.
Status: Pause, enable, or remove keywords, ads, or ad groups.
URLs: Update landing page URLs for multiple ads at once.
Ad Copy: Modify headlines, descriptions, and display URLs.
• Find and Replace: This is a lifesaver when you need to make consistent changes across your account. For example, if you're rebranding and need to update your company name in all your ads, the Find and Replace tool can do it in seconds.
• Example Scenario: Updating Landing Page URLs
Let's say you've redesigned your website and need to update all your landing page URLs. Here's how you'd do it: Select all the ads in your account (or a specific campaign or ad group).
Go to the Edit Panel and find the "Final URL" field.
Click the "Replace" button.
Enter the old URL in the "Find" field and the new URL in the "Replace with" field.
Click "Replace," and voilà – all your URLs are updated!
Advanced Strategies for Maximum Impact
Now that you've mastered the basics, let's dive into some advanced techniques that will take your Google Ads Editor skills to the next level. Think of these as the secret recipes that separate the amateur chefs from the Michelin-starred masters.
• Using Rules to Automate Changes: Rules allow you to automate certain tasks based on specific conditions. For example, you can create a rule to automatically increase bids for keywords with a high conversion rate. This can save you tons of time and ensure your campaigns are always optimized.
• Creating Shared Libraries: Shared libraries let you reuse assets across multiple campaigns. This is especially useful for things like sitelink extensions and callout extensions. By using shared libraries, you can ensure consistency and save time when creating new campaigns.
• Offline Campaign Building: One of the biggest advantages of Google Ads Editor is the ability to build entire campaigns offline. This is perfect for when you're traveling or working in areas with limited internet connectivity. You can create your campaigns, keywords, and ads offline and then upload them to Google Ads when you're back online.
• Importing and Exporting Data: Google Ads Editor allows you to import and export data in CSV format. This is useful for analyzing your campaign performance in spreadsheets or for importing data from other sources. For example, you can export your keyword data, analyze it in Excel, and then import the updated data back into Google Ads Editor.
• A/B Testing Like a Pro: Google Ads Editor makes A/B testing incredibly easy. You can quickly create multiple ad variations, test different headlines, descriptions, and landing pages, and then analyze the results to see which variations perform best.
Best Practices for a Smooth Workflow
To ensure a smooth and efficient workflow, here are some best practices to keep in mind. Think of these as the essential ingredients for a perfectly executed recipe.
• Regularly Download Recent Changes: Before making any changes, always download the latest version of your campaigns. This will ensure you're working with the most up-to-date data and avoid conflicts when you upload your changes.
• Use Labels for Organization: Labels are a great way to organize your campaigns, ad groups, and keywords. You can use labels to track performance, identify different segments of your audience, or simply to keep your account organized.
• Review Changes Before Posting: Before posting your changes to Google Ads, always review them carefully. This is your last chance to catch any errors or mistakes before they go live.
• Post Changes in Small Batches: Instead of posting a massive amount of changes all at once, it's best to post them in smaller batches. This makes it easier to troubleshoot any issues that may arise.
• Take Advantage of Keyboard Shortcuts: Google Ads Editor has a ton of keyboard shortcuts that can save you time and effort. Learn the most common shortcuts and use them regularly to speed up your workflow.
Troubleshooting Common Issues
Even with the best preparation, you might encounter some issues along the way. Here are some common problems and how to fix them.
• Conflicts When Posting Changes: This usually happens when someone else has made changes to the same campaign in the online interface. To resolve this, download the latest changes and reconcile the differences.
• Errors During Import: Errors during import usually occur when the CSV file is not formatted correctly. Make sure the file is in the correct format and that all the required fields are present.
• Slow Performance: If Google Ads Editor is running slowly, try closing other applications, clearing your cache, or upgrading your computer's hardware.
• Account Not Syncing: If your account is not syncing properly, try disconnecting and reconnecting your Google account. You may also need to clear your browser's cache and cookies.
Frequently Asked Questions
Let's tackle some common questions about using Google Ads Editor. Think of this as your cheat sheet for quick answers and helpful tips.
• Can I use Google Ads Editor for multiple Google Ads accounts? Absolutely! You can add and manage multiple Google Ads accounts within the Editor. Just add each account separately using the "Add account" button.
• Is Google Ads Editor available for both Mac and Windows? Yes, Google Ads Editor is available for both Mac and Windows operating systems.
• Does Google Ads Editor support all Google Ads features? While Google Ads Editor supports most Google Ads features, there may be some newer features that are not yet fully supported. Keep an eye on Google's documentation for the latest updates.
• How often should I download recent changes? It's a good practice to download recent changes at least once a day, or more frequently if you're working on a team.
Conclusion
So there you have it, friends! A comprehensive guide to mastering Google Ads Editor. We've covered everything from setting up the Editor to making bulk edits, using advanced strategies, following best practices, and troubleshooting common issues. You now have the knowledge and tools to take your Google Ads campaigns to the next level!
Remember, Google Ads Editor is not just a tool; it's your secret weapon for efficiency, optimization, and ultimately, success. By embracing its power, you can save time, improve performance, and achieve the ROI you've always dreamed of. The issue, however, is that mastering any new tool takes practice, so don't be afraid to experiment, make mistakes, and learn from them. Start small, focus on one area at a time, and gradually expand your skills. And remember, the Google Ads landscape is constantly evolving, so stay curious, keep learning, and never stop exploring new ways to improve your campaigns.
Now, I challenge you to take action. Download Google Ads Editor today (if you haven't already), connect your account, and start experimenting with the techniques we've discussed. Make some bulk edits, create a rule, or build a campaign offline. The possibilities are endless! What's one small change you'll make to your Google Ads campaigns using Google Ads Editor this week?
Go forth and conquer the world of paid advertising, friends! You've got this! And remember, every click counts, every conversion matters, and every improvement you make with Google Ads Editor brings you one step closer to your goals.
Post a Comment for "Step-by-Step Guide to Using Google Ads Editor"
Post a Comment