Step-by-Step Guide to Creating Facebook Pixel Events
Step-by-Step Guide to Creating Facebook Pixel Events: Unlock Your Facebook Ad Superpowers
Okay, friends, let’s talk about unlocking thesecretweapon in your Facebook advertising arsenal: Facebook Pixel events. Ever wonder how some businesses seem to know exactly what you’re thinking and show youthatperfect ad atthatperfect time? Chances are, they’re wielding the power of custom events. This step-by-step guide to creating Facebook Pixel events reveals how you can also track user behavior, optimize ad campaigns, and finally stop throwing money at ads that aren't working.
## Understanding the Power of Facebook Pixel Events
So, you’ve got a Facebook Pixel installed. Great! But simply having the Pixel is like owning a Ferrari and only driving it around the block. You’re not even scratching the surface of its potential. The real magic happens when you start setting upevents. Think of events as little digital breadcrumbs left by your website visitors. They tell you exactly what users are doing on your site: which products they’re viewing, which forms they’re submitting, and most importantly, whether or not they'reactuallybuying anything!
Why is this so important? Well, imagine you're trying to sell, let’s say, customized dog sweaters. Without events, you’re basically shouting into the void, hoping someone,anyone, needs a tiny, adorable sweater for their chihuahua. But with events, you can identify the people who have viewed your "Personalized Paw Print Sweater" page buthaven’tadded it to their cart. These are yourlow-hanging fruit! You can then target them with a special discount or a cute picture of a dog rocking a similar sweater. Boom! Suddenly, your ads are laser-focused, and your sales go through the roof.
Events let you track specific actions that are most valuable to your business. And in the ever-changing landscape of digital marketing, understanding your audience is more important than ever. With privacy regulations tightening and cookie tracking becoming less reliable, Facebook Pixel events offer a way to gather valuable first-party data – data you own and control. This data is absolutely essential for creating effective ad campaigns, personalizing customer experiences, and measuring the true ROI of your marketing efforts. Ready to dive in and transform your Facebook ads from a guessing game into a data-driven masterpiece? Keep reading, because we’re about to get into the nitty-gritty, step-by-step guide to creating Facebook Pixel events.
## Setting Up Your Facebook Pixel
Before we can start creating events, you need to make sure your Facebook Pixel is properly installed on your website. Don't worry; it's not as scary as it sounds. Let’s break it down:
### Locating Your Pixel Base Code
First things first, head over to your Facebook Business Manager. If you don’t have one yet, go create it! In Business Manager, navigate to "Events Manager." You'll find this under the "All Tools" menu. Select your business, and then you should see your Pixel listed. If you don't have a Pixel set up yet, Facebook will walk you through the initial setup process.
Once you've located your Pixel, click on it to see its details. You'll see something that says "Set up Pixel." Click on that, and you'll be presented with a few options. Choose "Manually add Pixel code to website." This will give you the base code. It looks like a bunch of gibberish, but don't be intimidated!
### Installing the Pixel Base Code on Your Website
Now comes the slightly technical part. You need to paste this Pixel base code into the
section of every page of your website. This means opening up your website's code (usually through your content management system, like Word Press, Shopify, or Wix) and finding thesection.For Word Press users: There are several ways to do this. You can edit your theme'sheader.phpfile directly (be careful!), use a plugin like "Insert Headers and Footers," or use a theme that has a dedicated field for Pixel code.
For Shopify users: Go to Online Store > Themes > Actions > Edit code. Then, find thetheme.liquidfile and paste the code right before the closingtag.
For Wix users: Go to Marketing & SEO > Marketing Integrations > Facebook Pixel. Then, paste your Pixel ID in the provided field.
After pasting the code,save your changesand clear your website's cache if necessary.
### Verifying Your Pixel Installation
Once your Pixel is installed, it’s time to make sure it’s actually working. The easiest way to do this is by using the Facebook Pixel Helper Chrome extension. Download and install it from the Chrome Web Store.
Once installed, visit your website. The Pixel Helper icon in your browser toolbar should light up, indicating that the Pixel is firing. Click on the icon to see details about the Pixel and any events that are being tracked. If everything looks good, congratulations! Your Pixel is up and running. If you see any errors, double-check that you’ve pasted the code correctly and that your website cache isn't interfering.
## Standard Events vs. Custom Events: Knowing the Difference
Now that your Pixel is installed, let’s talk aboutevents. Facebook offers two main types of events: standard events and custom events. Understanding the difference is crucial for effective tracking.
### Standard Events: The Ready-Made Options
Standard events are pre-defined actions that Facebook recognizes and understands. These include things like: Page View: Tracks when someone views a page on your website. This is automatically tracked by the base code. View Content: Tracks when someone views a specific product or content page. Add To Cart: Tracks when someone adds an item to their shopping cart. Initiate Checkout: Tracks when someone begins the checkout process. Add Payment Info: Tracks when someone enters their payment information. Purchase: Tracks when someone completes a purchase. Lead: Tracks when someone submits a lead form. Complete Registration: Tracks when someone completes a registration form.
These standard events are super convenient because Facebook already knows what they mean. This makes it easier to optimize your ad campaigns for specific goals, like driving purchases or generating leads.
### Custom Events: Tracking the Unique Stuff
But what if you want to track something that isn’t covered by the standard events? That’s wherecustom eventscome in. Custom events allow you to track any action on your website, no matter how specific or unique. For example:
Someone downloading a whitepaper.
Someone watching a video on your website.
Someone clicking on a specific button.
Someone spending a certain amount of time on a page.
Custom events give you the flexibility to track the actions that are most meaningful toyourbusiness. They allow you to gather granular data about user behavior and create highly targeted audiences.
### Choosing the Right Event Type
So, which type of event should you use? Ideally, you should use standard events whenever possible. This makes it easier for Facebook to understand your data and optimize your campaigns. However, if you need to track something that isn’t covered by the standard events, don’t hesitate to use a custom event. The key is tobe specificandconsistentwith your event naming conventions. This will make it easier to analyze your data and create effective audiences.
## Step-by-Step Guide to Creating Standard Events
Okay, let’s get practical. Here’s how to set up standard events on your website. There are a few different ways to do this, but we’ll focus on the most common method: using code.
### Implementing Standard Events with Code
To implement a standard event, you need to add a small snippet of code to the page where the event occurs. This code snippet tells the Pixel to fire the event when someone takes the desired action.
For example, let’s say you want to track when someone adds an item to their shopping cart. You would add the following code snippet to the button or link that adds the item to the cart:
```javascript
fbq('track', 'Add To Cart', {
content_ids: ['PRODUCT_ID'],
content_type: 'product',
value: 19.99,
currency: 'USD'
});
```
Let’s break down this code: `fbq('track', 'Add To Cart', ...)`: This tells the Pixel to track the "Add To Cart" event. `content_ids: ['PRODUCT_ID']`: This specifies the ID of the product being added to the cart. Replace `PRODUCT_ID` with the actual product ID. `content_type: 'product'`: This specifies that the content being added is a product. `value: 19.99`: This specifies the price of the product. `currency: 'USD'`: This specifies the currency.
You can customize this code to include other parameters, such as the product name, category, and quantity. The more information you provide, the better Facebook can understand your data.
### Example: Tracking Purchases
Let’s look at another example: tracking purchases. You would add the following code snippet to the thank-you page or order confirmation page:
```javascript
fbq('track', 'Purchase', {
value: 99.99,
currency: 'USD',
content_ids: ['PRODUCT_ID_1', 'PRODUCT_ID_2'],
content_type: 'product',
num_items: 2
});
```
`value: 99.99`: This specifies the total value of the purchase. `currency: 'USD'`: This specifies the currency. `content_ids: ['PRODUCT_ID_1', 'PRODUCT_ID_2']`: This specifies the IDs of the products purchased. `content_type: 'product'`: This specifies that the content being purchased is a product. `num_items: 2`: This specifies the number of items purchased.
Again, replace the placeholder values with the actual values for your purchase.
### Best Practices for Standard Events
Here are a few best practices to keep in mind when implementing standard events: Be consistent: Use the same event names and parameters across your website. Be accurate: Make sure the data you’re sending to Facebook is accurate and up-to-date. Test your events: Use the Facebook Pixel Helper to verify that your events are firing correctly. Use parameters wisely: Include as much relevant information as possible to help Facebook understand your data.
## Step-by-Step Guide to Creating Custom Events
Now, let’s move on to custom events. These are a bit more flexible, but they also require a bit more setup.
### Defining Your Custom Event
The first step is to define what action you want to track with your custom event. Think about what’s most important to your business and what you want to measure. For example, you might want to track:
Downloads of a PDF guide.
Clicks on a "Request a Quote" button.
Views of a specific video.
Once you’ve defined your custom event, you need to give it a name. Choose a name that is descriptive and easy to understand. For example, "Download_PDF_Guide" or "Click_Request_Quote_Button."
### Implementing Custom Events with Code
To implement a custom event, you use the same `fbq('track', ...)` function, but you replace the standard event name with your custom event name. For example:
```javascript
fbq('track', 'Download_PDF_Guide');
```
This simple code snippet will track every time someone downloads your PDF guide.
You can also include parameters with your custom events to provide more information. For example:
```javascript
fbq('track', 'Click_Request_Quote_Button', {
form_type: 'Contact Form',
page_url: 'https://example.com/contact'
});
```
`form_type: 'Contact Form'`: This specifies the type of form that was submitted. `page_url: 'https://example.com/contact'`: This specifies the URL of the page where the form was submitted.
### Example: Tracking Video Views
Let’s look at another example: tracking views of a specific video. You would add the following code snippet to the video player on your website:
```javascript
fbq('track', 'View_Video', {
video_title: 'How to Choose the Right Dog Sweater',
video_duration: 120,
video_url: 'https://example.com/video/dog-sweater'
});
```
`video_title: 'How to Choose the Right Dog Sweater'`: This specifies the title of the video. `video_duration: 120`: This specifies the duration of the video in seconds. `video_url: 'https://example.com/video/dog-sweater'`: This specifies the URL of the video.
### Best Practices for Custom Events
Here are a few best practices to keep in mind when implementing custom events: Choose descriptive names: Use names that clearly indicate what the event is tracking. Use parameters wisely: Include relevant information to help you analyze your data. Be consistent: Use the same naming conventions and parameters across your website. Test your events: Use the Facebook Pixel Helper to verify that your events are firing correctly.
## Testing and Troubleshooting Your Pixel Events
So, you've meticulously set up your Facebook Pixel and added your standard and custom events.Excellent! But before you start patting yourself on the back, it’s crucial to ensure everything is working correctly. After all, what good is data if it’s not accurate?
### Using the Facebook Pixel Helper
We mentioned the Facebook Pixel Helper earlier, but it’s worth reiterating how valuable this tool is. This Chrome extension is your best friend when it comes to testing and troubleshooting your Pixel events.
Installation:If you haven't already, download the Facebook Pixel Helper from the Chrome Web Store. Verification: Visit the pages on your website where you’ve implemented Pixel events. The Pixel Helper icon should light up, indicating that the Pixel is firing. Event Details:Click on the Pixel Helper icon to see a list of the events that are being tracked on the page. It will show you the event name, the parameters that are being sent, and any errors that might be occurring.
If you see any errors, don't panic! The Pixel Helper will usually provide helpful information about what went wrong. Common errors include: Pixel Not Found: This means the Pixel base code is not installed correctly on the page. Double-check that you’ve pasted the code in thesection and that your website cache isn’t interfering. Invalid Event Name: This means you’ve used an incorrect or misspelled event name. Make sure you’re using the correct standard event names or that your custom event names are consistent. Missing Parameters:This means you’re not sending all the required parameters for an event. Check the Facebook documentation to see what parameters are required for each event.
### Using the Facebook Events Manager
Another way to test your Pixel events is through the Facebook Events Manager. This allows you to see a real-time view of the events that are being tracked on your website.
Navigate to Events Manager: Go to your Facebook Business Manager and navigate to "Events Manager." View Activity: Select your Pixel and click on the "Test Events" tab. Test Events Tool: Enter your website URL in the "Open Website" box and browse your website, triggering the events you want to test. Real-Time Data: As you browse, you’ll see the events being tracked in real-time in the Events Manager. This allows you to quickly verify that your events are firing correctly and that the data is being sent to Facebook.
### Common Troubleshooting Tips
Here are a few additional troubleshooting tips to keep in mind: Check Your Code: Double-check that you’ve pasted the code snippets correctly and that there are no typos or syntax errors. Clear Your Cache: Sometimes, your website cache can interfere with the Pixel. Try clearing your cache and cookies to see if that resolves the issue. Disable Browser Extensions: Some browser extensions can interfere with the Pixel. Try disabling your extensions one by one to see if that fixes the problem. Consult the Facebook Documentation: The Facebook documentation is a valuable resource for troubleshooting Pixel issues. It provides detailed information about each event and parameter. Seek Help from the Community:If you’re still having trouble, don’t hesitate to ask for help from the Facebook advertising community. There are many forums and groups where you can get advice and support from other advertisers.
## Leveraging Facebook Pixel Events for Ad Optimization
Okay, now for thereallyexciting part! You’ve got your Pixel set up, your events are firing correctly, and you’re collecting valuable data about your website visitors. Now, how do you actuallyusethis data to optimize your ad campaigns and drive better results?
### Creating Custom Audiences
One of the most powerful ways to leverage Facebook Pixel events is by creatingcustom audiences. Custom audiences allow you to target your ads to specific groups of people based on their behavior on your website.
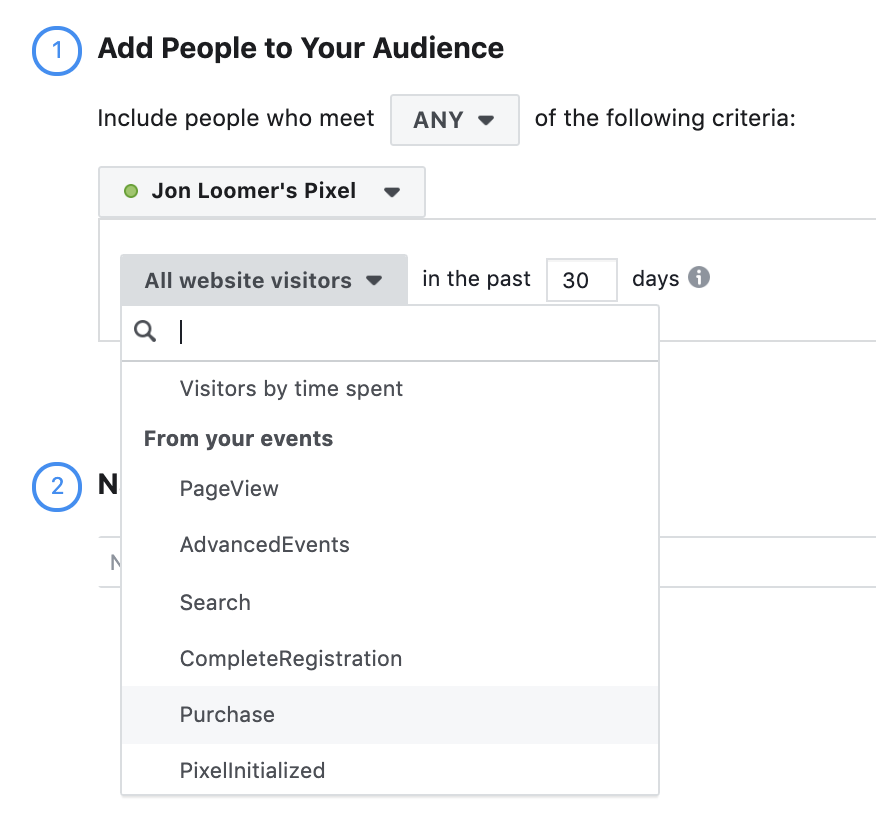
Here are a few examples of custom audiences you can create: Website Visitors: Target people who have visited your website in the past. This is a great way to re-engage people who have already shown interest in your products or services. People Who Viewed Specific Pages: Target people who have viewed specific product pages or content pages on your website. This allows you to show them ads that are highly relevant to their interests. People Who Added Items to Their Cart but Didn’t Purchase: Target people who have added items to their cart but didn’t complete the checkout process. This is a great way to remind them about their abandoned cart and offer them a special discount or incentive to complete their purchase. People Who Completed a Specific Action: Target people who have completed a specific action on your website, such as downloading a PDF guide or submitting a lead form. This allows you to follow up with them and nurture them further down the sales funnel.
To create a custom audience, go to your Facebook Ads Manager and navigate to Audiences.Click on "Create Audience" and select "Custom Audience." Then, choose "Website" as your source and select the events you want to use to build your audience. You can also specify a time frame for how long you want to include people in the audience.
### Creating Lookalike Audiences
Another powerful way to leverage Facebook Pixel events is by creatinglookalike audiences. Lookalike audiences allow you to target new people who are similar to your existing customers or website visitors.
Facebook uses the data from your Pixel events to identify the characteristics and behaviors of your best customers. It then finds other people on Facebook who share those same characteristics and behaviors.
To create a lookalike audience, go to your Facebook Ads Manager and navigate to Audiences.Click on "Create Audience" and select "Lookalike Audience." Then, choose your custom audience as the source and select the country you want to target. You can also specify the size of the lookalike audience.
### Optimizing Ad Campaigns
In addition to creating custom audiences and lookalike audiences, you can also use Facebook Pixel events to optimize your ad campaigns directly.
For example, you can optimize your campaigns for: Conversions: Tell Facebook to show your ads to people who are most likely to complete a specific action on your website, such as making a purchase or submitting a lead form. Value Optimization: Tell Facebook to show your ads to people who are most likely to spend the most money on your website. This is a great option if you sell high-value products or services.
To optimize your ad campaigns for conversions or value optimization, select the "Conversions" objective when creating your campaign and choose the relevant Pixel event as your conversion event.
By leveraging Facebook Pixel events for ad optimization, you can significantly improve the performance of your campaigns and drive better results for your business.
## Privacy Considerations and Compliance
Before diving headfirst into data collection, it'scrucialto address the ethical and legal considerations surrounding Facebook Pixel events. Data privacy is a hot topic, and compliance is non-negotiable.
### Transparency and User Consent
First and foremost, transparency is key. Your website visitors need to know that you're collecting data about their behavior, and they need to have the option to opt out.
Privacy Policy: Your website should have a clear and comprehensive privacy policy that explains what data you collect, how you use it, and with whom you share it. Make sure to specifically mention that you’re using the Facebook Pixel and explain how it works. Cookie Consent Banner: You should implement a cookie consent banner on your website that asks visitors for their permission to collect data using cookies and similar technologies. This banner should provide clear information about the types of cookies you use and how visitors can manage their preferences. Opt-Out Option:You should provide visitors with an easy way to opt out of data collection. This could be a link to a page where they can manage their cookie preferences or a browser extension that blocks the Facebook Pixel.
### Compliance with Regulations
In addition to transparency and user consent, you also need to comply with relevant data privacy regulations. Some of the most important regulations to be aware of include: GDPR (General Data Protection Regulation): This is a European Union regulation that applies to any organization that collects or processes the personal data of EU residents. If you have visitors from the EU, you need to comply with GDPR. CCPA (California Consumer Privacy Act): This is a California law that gives California residents more control over their personal data. If you have visitors from California, you need to comply with CCPA.
These regulations require you to: Obtain explicit consent before collecting data. Provide users with the right to access, correct, and delete their data. Implement appropriate security measures to protect data from unauthorized access. Be transparent about how you use data.
### Best Practices for Privacy and Compliance
Here are a few best practices to follow to ensure you’re complying with data privacy regulations: Consult with a legal professional: If you’re unsure about your obligations, consult with a legal professional who specializes in data privacy. Stay up-to-date on the latest regulations: Data privacy regulations are constantly evolving, so it’s important to stay informed about the latest changes. Implement robust security measures: Protect your data from unauthorized access by implementing strong passwords, encrypting sensitive data, and regularly updating your security software. Be transparent with your users: Provide clear and concise information about your data collection practices. Respect user preferences:Give users the option to opt out of data collection and respect their choices.
By prioritizing privacy and compliance, you can build trust with your users and avoid costly legal penalties.
Okay,friends, you've reached the finish line! This guide covered everything from setting up your Facebook Pixel and defining standard and custom events, to testing, troubleshooting, and leveraging those events for ad optimization and privacy compliance. The goal was to demystify the process and empower you to take control of your Facebook advertising strategy.
Now is the time to put this knowledge into action. Log in to your Facebook Business Manager, review your Pixel setup, and start creating events that are relevant to your business goals. Experiment with different custom audiences and ad optimization strategies to see what works best for you.
Ready to transform your Facebook ads from a shot in the dark to a laser-focused campaign? Go for it!
Post a Comment for "Step-by-Step Guide to Creating Facebook Pixel Events"
Post a Comment